EXTRA THICK
Posa a Colla su Massetto
– Laying on Screed with Adhesive • Verlegung im Kleberbett auf Estrich • Pose Collée sur Chape • Colocación con Cola Sobre
Capa de Relleno • Наклеивание на Стяжку
LAYING SOLUTIONS
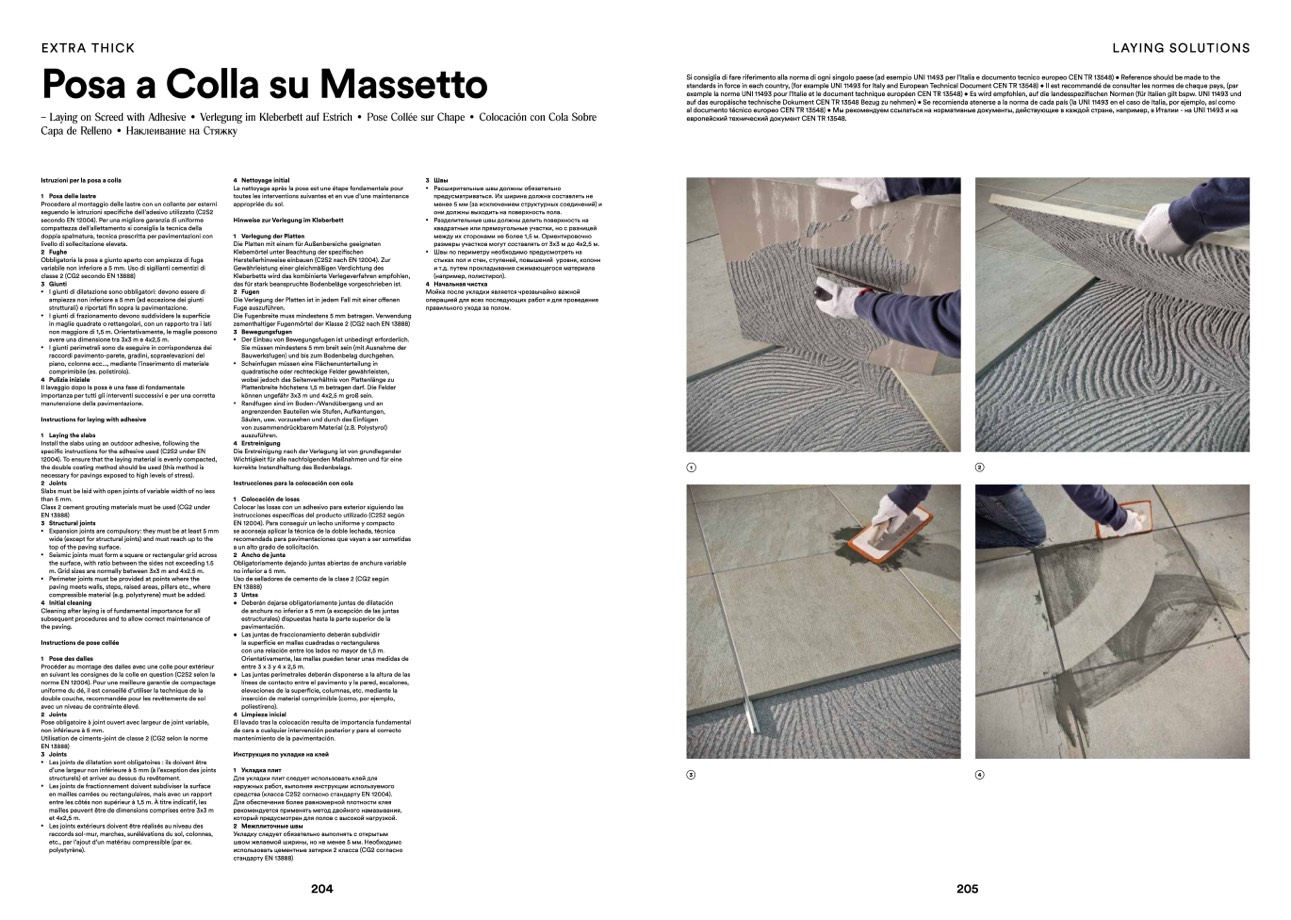
Istruzioni per la posa a colla
1 Posa delle lastre
Procedere al montaggio delle lastre con un collante per esterni
seguendo le istruzioni speci
fiche dell’adesivo utilizzato (C2S2
secondo EN 12004). Per una migliore garanzia di uniforme
compattezza dell’allettamento si consiglia la tecnica della
doppia spalmatura, tecnica prescritta per pavimentazioni con
livello di sollecitazione elevata.
2 Fughe
Obbligatoria la posa a giunto aperto con ampiezza di fuga
variabile non inferiore a 5 mm. Uso di sigillanti cementizi di
classe 2 (CG2 secondo EN 13888)
3 Giunti
•
I giunti di dilatazione sono obbligatori: devono essere di
ampiezza non inferiore a 5 mm (ad eccezione dei giunti
strutturali) e riportati
fin sopra la pavimentazione.
•
I giunti di frazionamento devono suddividere la superficie
in maglie quadrate o rettangolari, con un rapporto tra i lati
non maggiore di 1,5 m. Orientativamente, le maglie possono
avere una dimensione tra 3x3 m e 4x2,5 m.
•
I giunti perimetrali sono da eseguire in corrispondenza dei
raccordi pavimento-parete, gradini, sopraelevazioni del
piano, colonne ecc..., mediante l’inserimento di materiale
comprimibile (es. polistirolo).
4 Pulizia iniziale
Il lavaggio dopo la posa
è una fase di fondamentale
importanza per tutti gli interventi successivi e per una corretta
manutenzione della pavimentazione.
Instructions for laying with adhesive
1 Laying the slabs
Install the slabs using an outdoor adhesive, following the
specific instructions for the adhesive used (C2S2 under EN
12004). To ensure that the laying material is evenly compacted,
the double coating method should be used (this method is
necessary for pavings exposed to high levels of stress).
2 Joints
Slabs must be laid with open joints of variable width of no less
than 5 mm.
Class 2 cement grouting materials must be used (CG2 under
EN 13888)
3 Structural joints
•
Expansion joints are compulsory: they must be at least 5 mm
wide (except for structural joints) and must reach up to the
top of the paving surface.
•
Seismic joints must form a square or rectangular grid across
the surface, with ratio between the sides not exceeding 1.5
m. Grid sizes are normally between 3x3 m and 4x2.5 m.
•
Perimeter joints must be provided at points where the
paving meets walls, steps, raised areas, pillars etc., where
compressible material (e.g. polystyrene) must be added.
4 Initial cleaning
Cleaning after laying is of fundamental importance for all
subsequent procedures and to allow correct maintenance of
the paving.
Instructions de pose coll
ée
1 Pose des dalles
Proc
éder au montage des dalles avec une colle pour ext
érieur
en suivant les consignes de la colle en question (C2S2 selon la
norme EN 12004). Pour une meilleure garantie de compactage
uniforme du d
é, il est conseillé d’utiliser la technique de la
double couche, recommandée pour les revêtements de sol
avec un niveau de contrainte
élev
é.
2 Joints
Pose obligatoire à joint ouvert avec largeur de joint variable,
non inf
érieure à 5 mm.
Utilisation de ciments-joint de classe 2 (CG2 selon la norme
EN 13888)
3 Joints
•
Les joints de dilatation sont obligatoires : ils doivent être
d’une largeur non inf
érieure à 5 mm (à l’exception des joints
structurels) et arriver au dessus du rev
êtement.
•
Les joints de fractionnement doivent subdiviser la surface
en mailles carr
ées ou rectangulaires, mais avec un rapport
entre les c
ôtés non supérieur à 1,5 m. À titre indicatif, les
mailles peuvent être de dimensions comprises entre 3x3 m
et 4x2,5 m.
•
Les joints ext
érieurs doivent être r
éalis
és au niveau des
raccords sol-mur, marches, sur
élévations du sol, colonnes,
etc., par l’ajout d’un mat
ériau compressible (par ex.
polystyr
ène).
4 Nettoyage initial
Le nettoyage apr
ès la pose est une
étape fondamentale pour
toutes les interventions suivantes et en vue d’une maintenance
appropriée du sol.
Hinweise zur Verlegung im Kleberbett
1 Verlegung der Platten
Die Platten mit einem für Außenbereiche geeigneten
Klebem
örtel unter Beachtung der spezi
fischen
Herstellerhinweise einbauen (C2S2 nach EN 12004). Zur
Gewährleistung einer gleichm
äßigen Verdichtung des
Kleberbetts wird das kombinierte Verlegeverfahren empfohlen,
das für stark beanspruchte Bodenbeläge vorgeschrieben ist.
2 Fugen
Die Verlegung der Platten ist in jedem Fall mit einer offenen
Fuge auszuführen.
Die Fugenbreite muss mindestens 5 mm betragen. Verwendung
zementhaltiger Fugenmörtel der Klasse 2 (CG2 nach EN 13888)
3 Bewegungsfugen
•
Der Einbau von Bewegungsfugen ist unbedingt erforderlich.
Sie m
üssen mindestens 5 mm breit sein (mit Ausnahme der
Bauwerksfugen) und bis zum Bodenbelag durchgehen.
•
Scheinfugen müssen eine Flächenunterteilung in
quadratische oder rechteckige Felder gew
ährleisten,
wobei jedoch das Seitenverhältnis von Plattenl
änge zu
Plattenbreite h
öchstens 1,5 m betragen darf. Die Felder
können ungefähr 3x3 m und 4x2,5 m groß sein.
•
Randfugen sind im Boden-/Wandübergang und an
angrenzenden Bauteilen wie Stufen, Aufkantungen,
Säulen, usw. vorzusehen und durch das Einfügen
von zusammendr
ückbarem Material (z.B. Polystyrol)
auszuf
ühren.
4 Erstreinigung
Die Erstreinigung nach der Verlegung ist von grundlegender
Wichtigkeit für alle nachfolgenden Maßnahmen und für eine
korrekte Instandhaltung des Bodenbelags.
Instrucciones para la colocación con cola
1 Colocación de losas
Colocar las losas con un adhesivo para exterior siguiendo las
instrucciones específicas del producto utilizado (C2S2 según
EN 12004). Para conseguir un lecho uniforme y compacto
se aconseja aplicar la técnica de la doble lechada, t
écnica
recomendada para pavimentaciones que vayan a ser sometidas
a un alto grado de solicitación.
2 Ancho de junta
Obligatoriamente dejando juntas abiertas de anchura variable
no inferior a 5 mm.
Uso de selladores de cemento de la clase 2 (CG2 según
EN 13888)
3 Untas
• Deberán dejarse obligatoriamente juntas de dilataci
ón
de anchura no inferior a 5 mm (a excepción de las juntas
estructurales) dispuestas hasta la parte superior de la
pavimentaci
ón.
• Las juntas de fraccionamiento deberán subdividir
la super
ficie en mallas cuadradas o rectangulares
con una relaci
ón entre los lados no mayor de 1,5 m.
Orientativamente, las mallas pueden tener unas medidas de
entre 3 x 3 y 4 x 2,5 m.
• Las juntas perimetrales deberán disponerse a la altura de las
l
íneas de contacto entre el pavimento y la pared, escalones,
elevaciones de la super
ficie, columnas, etc. mediante la
inserción de material comprimible (como, por ejemplo,
poliestireno).
4 Limpieza inicial
El lavado tras la colocación resulta de importancia fundamental
de cara a cualquier intervención posterior y para el correcto
mantenimiento de la pavimentación.
Инструкция по укладке на клей
1 Укладка плит
Для укладки плит следует использовать клей для
наружных работ, выполняя инструкции используемого
средства (класса C2S2 согласно стандарту EN 12004).
Для обеспечения более равномерно
й плотности клея
рекомендуется применять метод дво
йного намазывания,
который предусмотрен для полов с высокой нагрузкой.
2 Межплиточные швы
Укладку следует обязательно выполнять с открытым
швом желаемой ширины, но не менее 5 мм. Необходимо
использовать цементные затирки 2 класса (CG2 согласно
стандарту EN 13888)
3 Швы
•
Расширительные швы должны обязательно
предусматриваться. Их ширина должна составлять не
менее 5 мм (за исключением структурных соединени
й) и
они должны выходить на поверхность пола.
•
Разделительные швы должны делить поверхность на
квадратные или прямоугольные участки, но с разнице
й
между их сторонами не более 1,5 м. Ориентировочно
размеры участков могут составлять от 3x3 м до 4x2,5 м.
•
Швы по периметру необходимо предусмотреть на
стыках пол и стен, ступеней, повышений уровня, колонн
и т.д. путем прокладывания сжимающегося материала
(например, полистирол).
4 Начальная чистка
Мойка после укладки является чрезвычайно важной
операцией для всех последующих работ и для проведения
правильного ухода за полом.
Si consiglia di fare riferimento alla norma di ogni singolo paese (ad esempio UNI 11493 per l’Italia e documento tecnico europeo CEN TR 13548) • Reference should be made to the
standards in force in each country, (for example UNI 11493 for Italy and European Technical Document CEN TR 13548) • Il est recommandé de consulter les normes de chaque pays, (par
exemple la norme UNI 11493 pour l’Italie et le document technique européen CEN TR 13548) • Es wird empfohlen, auf die landesspezifischen Normen (für Italien gilt bspw. UNI 11493 und
auf das europäische technische Dokument CEN TR 13548 Bezug zu nehmen) • Se recomienda atenerse a la norma de cada pa
ís (la UNI 11493 en el caso de Italia, por ejemplo, as
í como
al documento técnico europeo CEN TR 13548) • Мы рекомендуем ссылаться на нормативные документы, действующие в каждой стране, например, в Италии - на UNI 11493 и на
европейский технически
й документ CEN TR 13548.
1
2
3
4
204
205

