VENTILATED FACADES
FACCIATE A FUGA APERTA
FA
ÇADES WITH OPEN JOINTS - FASSADEN MIT OFFENEN FUGEN - FAÇADES À JOINT OUVERT - FACHADAS DE JUNTA ABIERTA
1
2
3
4
POSA IN OPERA
AGGANCI INVISIBILI
INSTALLATION WITH INVISIBLE ANCHORING DEVICES
VERLEGUNG MIT VERDECKTEN BEFESTIGUNGEN
MISE EN ŒUVRE FIXATIONS INVISIBLES
INSTALACIÓN CON ANCLAJES OCULTOS
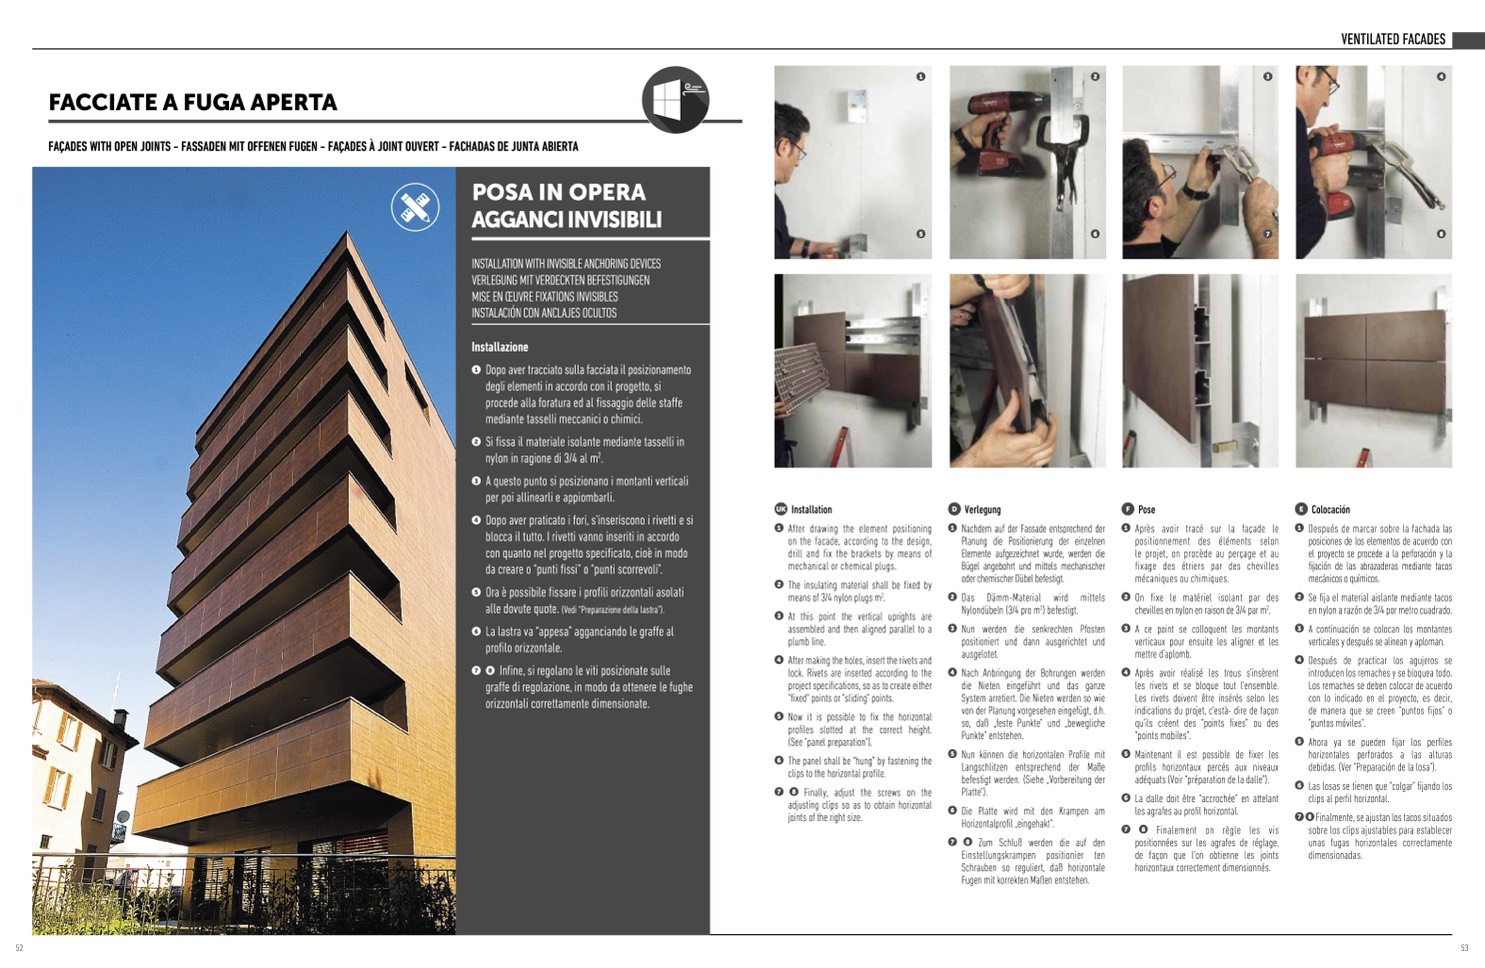
Installazione
1
Dopo aver tracciato sulla facciata il posizionamento
degli elementi in accordo con il progetto, si
procede alla foratura ed al fissaggio delle staffe
mediante tasselli meccanici o chimici.
2
Si fissa il materiale isolante mediante tasselli in
nylon in ragione di 3/4 al m
2
.
3
A questo punto si posizionano i montanti verticali
per poi allinearli e appiombarli.
4
Dopo aver praticato i fori, s’inseriscono i rivetti e si
blocca il tutto. I rivetti vanno inseriti in accordo
con quanto nel progetto specificato, cio
è in modo
da creare o “punti fissi” o “punti scorrevoli”.
5
Ora
è possibile fissare i profili orizzontali asolati
alle dovute quote. (Vedi “Preparazione della lastra”).
6
La lastra va “appesa” agganciando le graffe al
profilo orizzontale.
7
8
Infine, si regolano le viti posizionate sulle
graffe di regolazione, in modo da ottenere le fughe
orizzontali correttamente dimensionate.
5
6
7
8
UK
Installation
D
Verlegung
F
1
2
3
4
5
6
7
Pose
Après avoir trac
é sur la façade le
positionnement des él
éments selon
le projet, on proc
ède au perçage et au
fixage des
étriers par des chevilles
m
écaniques ou chimiques.
On fixe le mat
ériel isolant par des
chevilles en nylon en raison de 3/4 par m
2
.
A ce point se colloquent les montants
verticaux pour ensuite les aligner et les
mettre d’aplomb.
Après avoir réalisé les trous s’insèrent
les rivets et se bloque tout l’ensemble.
Les rivets doivent
être ins
érés selon les
indications du projet, c’està- dire de façon
qu’ils créent des “points fixes” ou des
“points mobiles”.
Maintenant il est possible de fixer les
profils horizontaux percés aux niveaux
adéquats (Voir “pr
éparation de la dalle”).
La dalle doit être “accroch
ée” en attelant
les agrafes au profil horizontal.
8
Finalement on r
ègle les vis
positionn
ées sur les agrafes de r
églage,
de fa
çon que l’on obtienne les joints
horizontaux correctement dimensionn
és.
E
Colocaci
ón
1
2
3
4
5
6
7
After drawing the element positioning
on the facade, according to the design,
drill and fix the brackets by means of
mechanical or chemical plugs.
The insulating material shall be fixed by
means of 3/4 nylon plugs m
2
.
At this point the vertical uprights are
assembled and then aligned parallel to a
plumb line.
After making the holes, insert the rivets and
lock. Rivets are inserted according to the
project specifications, so as to create either
"fixed" points or "sliding" points.
Now it is possible to fix the horizontal
profiles slotted at the correct height.
(See "panel preparation").
The panel shall be “hung” by fastening the
clips to the horizontal profile.
8
Finally, adjust the screws on the
adjusting clips so as to obtain horizontal
joints of the right size.
1
2
3
4
5
6
7
Nachdem auf der Fassade entsprechend der
Planung die Positionierung der einzelnen
Elemente aufgezeichnet wurde, werden die
Bügel angebohrt und mittels mechanischer
oder chemischer D
übel befestigt.
Das D
ämm-Material wird mittels
Nylond
übeln (3/4 pro m
2
) befestigt.
Nun werden die senkrechten Pfosten
positioniert und dann ausgerichtet und
ausgelotet.
Nach Anbringung der Bohrungen werden
die Nieten eingef
ührt und das ganze
System arretiert. Die Nieten werden so wie
von der Planung vorgesehen eingef
ügt, d.h.
so, daß „feste Punkte" und „bewegliche
Punkte" entstehen.
Nun können die horizontalen Profile mit
Langschlitzen entsprechend der Maße
befestigt werden. (Siehe „Vorbereitung der
Platte").
Die Platte wird mit den Krampen am
Horizontalprofil „eingehakt".
8
Zum Schluß werden die auf den
Einstellungskrampen positionier ten
Schrauben so reguliert, daß horizontale
Fugen mit korrekten Maßen entstehen.
1
2
3
4
5
6
7
Después de marcar sobre la fachada las
posiciones de los elementos de acuerdo con
el proyecto se procede a la perforación y la
fijación de las abrazaderas mediante tacos
mec
ánicos o químicos.
Se fija el material aislante mediante tacos
en nylon a razón de 3/4 por metro cuadrado.
A continuaci
ón se colocan los montantes
verticales y después se alinean y aploman.
Después de practicar los agujeros se
introducen los remaches y se bloquea todo.
Los remaches se deben colocar de acuerdo
con lo indicado en el proyecto, es decir,
de manera que se creen "puntos fijos" o
"puntos móviles".
Ahora ya se pueden fijar los perfiles
horizontales perforados a las alturas
debidas. (Ver "Preparaci
ón de la losa").
Las losas se tienen que "colgar" fijando los
clips al perfil horizontal.
8
Finalmente, se ajustan los tacos situados
sobre los clips ajustables para establecer
unas fugas horizontales correctamente
dimensionadas.
52
53

