EXTRA THICK
Posa Sopraelevata
– Raised Pavings • Pose Surélev
é • Verlegung auf Stelzlagern • Colocación Sobreelevada • Укладка Фальшполов
LAYING SOLUTIONS
Istruzioni per la posa sopraelevata
Preparare il sottofondo predisponendo sopra al solaio un
massetto con una pendenza adeguata. Applicarvi uno strato di
impermeabilizzazione per evitare in
filtrazioni e per consentire
il de
flusso delle acque piovane. Appoggiare i supporti in
polipropilene direttamente sullo strato di impermeabilizzazione
ed applicare le lastre con distanziatori per realizzare una fuga
adeguata. Ai
fini dell’incremento dell’isolamento termico/
prestazione energetica è possibile aggiungere pannelli
termoisolanti di adeguata densità, direttamente tra lo strato di
impermeabilizzazione ed i supporti del pavimento sopraelevato.
Per approfondimenti e video tutorial consultare la sezione posa
del sito www.marazzi.it
Per le pavimentazioni esterne non protette, Marazzi Group
consiglia di creare una pendenza ≥ 1,5% sulla superficie
calpestabile allo scopo di limitare il formarsi di ristagni d’acqua
localizzati. Nel caso in cui questi ristagni permangano sulla
super
ficie delle piastrelle nonostante una posa a regola d’arte,
è necessario intervenire meccanicamente con l’utilizzo di scope
o aspira-liquidi.
Prima della posa, si raccomanda una attenta valutazione da
parte del progettista relativamente a: destinazione d’uso
(pubblica o privata), intensità e tipologia di traffico, presenza
di acqua, carichi statici e dinamici attesi, condizioni climatiche
(frequenza ed intensit
à del vento in particolare). In caso di
posa sopraelevata, in particolare in ambienti pubblici, per
aumentare la resistenza allo sfondamento in conformit
à alla
norma EN 12825
è consigliata l’applicazione di lamiera zincata
sul retro delle lastre.
Instructions for installing raised pavings
Prepare the substrate by laying a screed with the correct
gradient above the existing surface. Apply a waterproof barrier
layer to prevent seepage and ensure e
ffective rainwater
drainage. Place the polypropylene pedestals straight on top of
the waterproo
fing membrane and add the slabs, with spacers
to ensure the correct joint width. For better thermal insulation/
energy performance, thermal insulating panels of suitable
density can be added directly between the waterproo
fing
membrane and the raised paving pedestals.
For further details and installation tutorial video, visit the
installation section of the www.marazzi.it website
For unprotected outdoor pavings, Marazzi Group recommends
the creation of a gradient of ≥ 1.5% on the
finished surface, to
prevent the formation of patches of standing water. In the event
that standing water persists on the surface of the tiles in spite
of correct installation, it must be removed mechanically with
the aid of brooms or wet-and-dry vacuum cleaners.
Before installation, architects are urged to make a careful
assessment of the intended use (public or private), type and
intensity of traffic, any water present, expected static and
dynamic loads, and weather conditions (especially wind
strength and frequency). In case of raised pavings, especially in
public places, application of galvanised plate to the underside
of slabs to increase load bearing capacity in accordance with
the EN 12825 standard is recommended.
Instructions pour la pose sur
élevée
Préparer le support en pr
évoyant, au-dessus du solivage,
une chape
à l’inclinaison appropriée. Appliquer une couche
d’imperméabilisation pour pr
évenir les infiltrations et a
fin de
permettre l’écoulement de l’eau de pluie. Placer les supports en
polypropyl
ène directement sur la couche d’imperm
éabilisation
et appliquer les dalles avec des entretoises afin de réaliser un
joint approprié. En vue d’am
éliorer l’isolation thermique et les
prestations énerg
étiques, il est possible d’ajouter des panneaux
à isolation thermique d’une densité appropri
ée, directement
entre la couche d’imperm
éabilisation et les supports du sol
sur
élevé.
Pour obtenir plus d’informations et pour visualiser les tutoriels,
consulter la section Pose sur le site www.marazzi.it
Pour des sols ext
érieurs non protégés, Marazzi Group conseille
de créer une inclinaison ≥ 1,5 % sur la surface de piétinement
en vue de limiter la stagnation localis
ée de l’eau. Si, malgr
é une
pose dans les règles de l’art, cette stagnation devait persister à
la surface des carreaux, une intervention m
écanique, au moyen
de balais et d’aspirateurs de liquides, est alors nécessaire.
Avant la mise en oeuvre, il est recommand
é à l’architecte
d’e
ffectuer une analyse minutieuse des él
éments suivants :
domaine d’application (public ou résidentiel), intensité/type
de trafic, pr
ésence d’eau, charges statiques et dynamiques
attendues, conditions climatiques (notamment fréquence
et intensité du vent). En cas de pose en plancher sur
élev
é,
notamment dans des espaces publics, conform
ément à la
norme EN 12825, il est recommandé d’appliquer une t
ôle
galvanisée au dos des dalles a
fin augmenter la résistance à la
charge de rupture.
Hinweise zur Verlegung auf Stelzlagern
Bereiten Sie den Untergrund vor, indem Sie auf dem Rohboden
einen Estrich mit angemessenem Gefälle einbauen. Bauen
Sie eine Abdichtung ein, um Infiltrationen zu vermeiden
und das Versickern des Regenwassers zu ermöglichen.
Setzen Sie die Stelzlager aus Polypropylen direkt auf die
Abdichtung und verlegen Sie die Platten mit Abstandshaltern,
um die richtige Fugenbreite zu erhalten. Zur Erhöhung der
Wärmedämmung/Energieeffizienz können Wärmedämmplatten
mit angemessener Dichte direkt zwischen der Abdichtung und
den Stelzlagern des Doppelbodens eingebaut werden.
Für ausführliche Informationen und Tutorialvideos siehe Bereich
Verlegung auf www.marazzi.it
Zur Unterbindung von punktueller Stauwasserbildung bei
Belägen in ungeschützten Außenbereichen, empfiehlt die
Marazzi Group die Ausbildung eines Gef
älles ≥ 1,5% auf der
Trittfläche. Sollte trotz fachgerechter Verlegung Stauwasser auf
der Fliesenoberfläche zurückbleiben, ist dessen mechanische
Entfernung mit Hilfe eines Besens oder Nasssaugers
erforderlich.
Vor der Verlegung sollte der Planer folgende Faktoren
sorgfältig zu prüfen: Anwendungsbereich (öffentlich oder
privat), Verkehrsaufkommen und -typologie, Vorhandensein
von Wasser, voraussichtliche statische und dynamische
Lasten sowie Klimabedingungen (insbesondere Häu
figkeit von
Windlasten und Windst
ärke). Vor allem bei der Verlegung von
Doppelböden in öffentlichen Bereichen wird die Anbringung
von verzinktem Blech an der Plattenrückseite empfohlen, um
die Bruchlast gemäß EN 12825 zu erhöhen.
Instrucciones para la colocación sobreelevada
Preparar la base disponiendo sobre el armaz
ón o entramado
una capa de relleno con una pendiente adecuada. Aplicar
una capa impermeabilizante para evitar
filtraciones y
permitir el drenaje de las aguas pluviales. Colocar los
soportes de polipropileno directamente encima de la capa
impermeabilizante y aplicar las losas con distanciadores
para dejar las juntas oportunas.Para aumentar el aislamiento
térmico y el rendimiento energ
ético se pueden poner paneles
termoaislantes de densidad adecuada, directamente entre
la capa impermeabilizante y los soportes del pavimento
sobreelevado.
Para ampliar informaci
ón y observar el vídeo tutorial, acceder al
apartado de colocación del sitio web www.marazzi.it
En el caso de pavimentaciones exteriores no protegidas,
Marazzi Group recomienda crear una pendiente ≥ 1,5% en la
super
ficie transitable para limitar la formación de depósitos
localizados de agua estancada. En caso de que estos depósitos
de agua permanezcan en la superficie del azulejo, aun cuando
la colocación se haya realizado correctamente, ser
á necesario
intervenir mec
ánicamente empleando un cepillo o un aspirador
de l
íquidos.
Antes de la colocación se recomienda que el proyectista valore
detenidamente: el uso que se le va a dar (p
úblico o privado), la
intensidad y el tipo de tr
áfico, la presencia de agua, las cargas
estáticas y dinámicas esperadas, las condiciones climáticas
(en especial tener en cuenta la frecuencia y la intensidad del
viento). En caso de colocación sobreelevada, en particular en
ámbitos p
úblicos, para aumentar la resistencia a la rotura de
conformidad con la norma EN 12825 se aconseja la aplicaci
ón
de chapa galvanizada en la parte de atrás de las placas.
Инструкция по укладке фальшполов
Подготовьте подстилающий слой, выполнив на
перекрытии стяжку с необходимым уклоном. Нанесите
гидроизоляционный слой для предотвращения
просачивания воды и для обеспечения стока
дождевой воды. Поставьте полипропиленовые опоры
непосредственно на гидроизоляционный слой и установите
плиты на разделительные элементы для создания
необходимого межплиточного шва. Для увеличения
теплоизоляции и энергетической эффективности
непосредственно между гидроизоляционным слоем и
опорами фальшпола можно проложить теплоизоляционные
панели необходимой плотности.
Более подробную информацию и обучающие
видеоматериалы можно найти в разделе укладки на сайте
www.marazzi.it
Для наружных незащищенных полов Marazzi Group
рекомендует создавать уклон ≥ 1,5% на пешеходно
й
поверхности для снижения образования локальных застоев
воды. В случае, если застои воды образуются на плитке
несмотря на правильную укладку, необходимо прибегать к
использованию механических средств, таких как щетки или
же аппараты для сбора жидкостей.
Перед укладкой проектировщику рекомендуется тщательно
изучить следующие аспекты: назначение (общественное
или частное), интенсивность и тип движения, наличие воды,
предполагаемые статические и динамические нагрузки,
климатические условия (в частности, периодичность и
сила ветра). В случае укладки фальшполов, в частности
на общественных объектах, рекомендуется установить
оцинкованную металлическую пластину на тыльную
сторону плит для повышения прочности на разрушение в
соответствии со стандартом EN 12825.
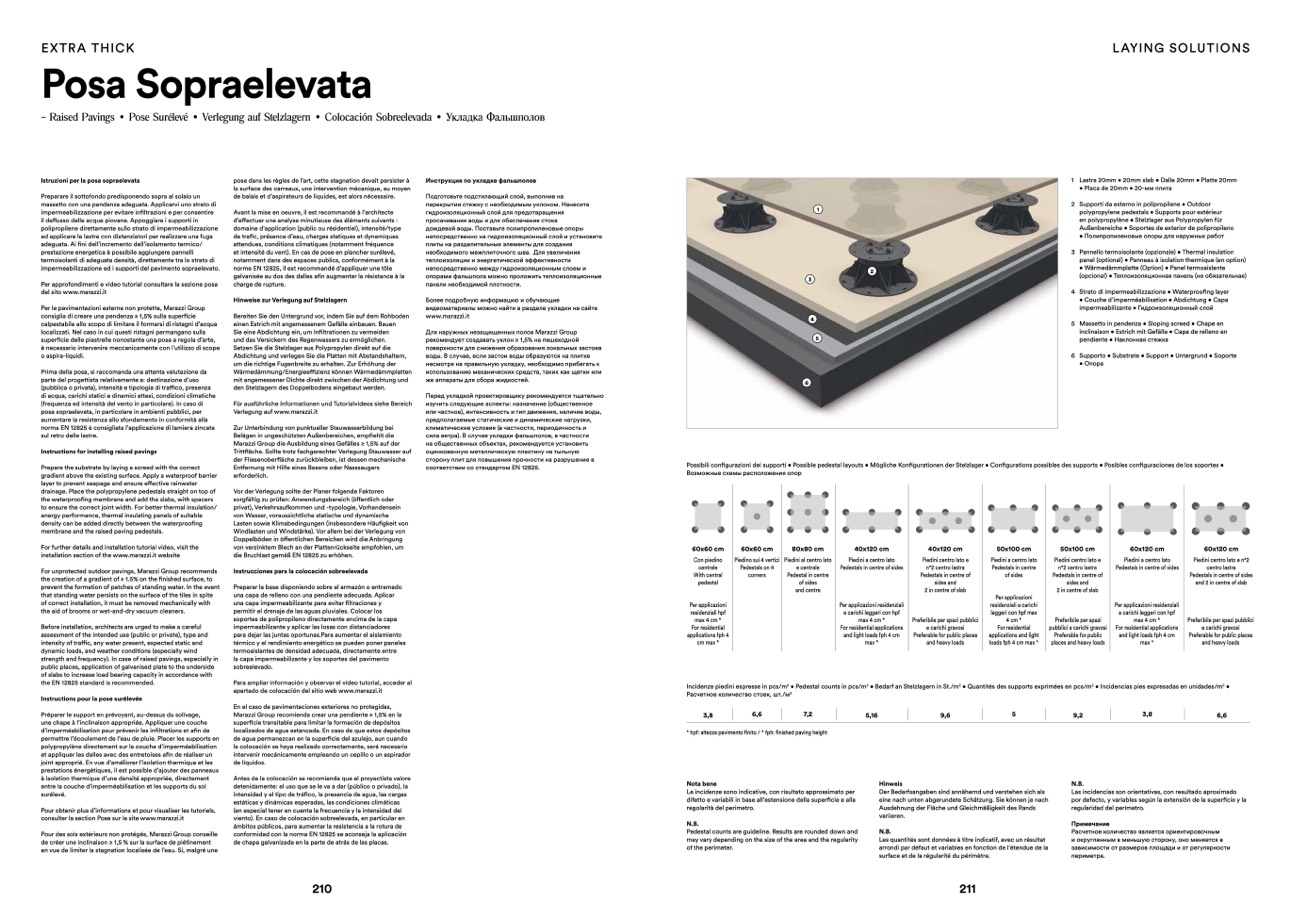
1 Lastra 20mm • 20mm slab • Dalle 20mm • Platte 20mm
• Placa de 20mm • 20-мм плита
2 Supporti da esterno in polipropilene • Outdoor
polypropylene pedestals • Supports pour extérieur
en polypropyl
ène • Stelzlager aus Polypropylen für
Außenbereiche • Soportes de exterior de polipropileno
• Полипропиленовые опоры для наружных работ
3 Pannello termoisolante (opzionale) • Thermal insulation
panel (optional) • Panneau à isolation thermique (en option)
• Wärmedämmplatte (Option) • Panel termoaislante
(opcional) • Теплоизоляционная панель (не обязательная)
4 Strato di impermeabilizzazione • Waterproo
fing layer
• Couche d’imperm
éabilisation • Abdichtung • Capa
impermeabilizante • Гидроизоляционный слой
5 Massetto in pendenza • Sloping screed • Chape en
inclinaison • Estrich mit Gef
älle • Capa de relleno en
pendiente • Наклонная стяжка
6 Supporto • Substrate • Support • Untergrund • Soporte
• Опора
Possibili configurazioni dei supporti • Possible pedestal layouts • M
ögliche Konfigurationen der Stelzlager • Con
figurations possibles des supports • Posibles configuraciones de los soportes •
Возможные схемы расположения опор
1
3
4
5
6
2
60x60 cm
Con piedino
centrale
With central
pedestal
Per applicazioni
residenziali hpf
max 4 cm *
For residential
applications fph 4
cm max *
60x60 cm
80x80 cm
40x120 cm
Piedini a centro lato
Pedestals in centre of sides
Per applicazioni residenziali
e carichi leggeri con hpf
max 4 cm *
For residential applications
and light loads fph 4 cm
max *
40x120 cm
Piedini centro lato e
n°2 centro lastra
Pedestals in centre of
sides and
2 in centre of slab
Preferibile per spazi pubblici
e carichi gravosi
Preferable for public places
and heavy loads
50x100 cm
Piedini a centro lato
Pedestals in centre
of sides
Per applicazioni
residenziali e carichi
leggeri con hpf max
4 cm *
For residential
applications and light
loads fph 4 cm max *
50x100 cm
Piedini centro lato e
n°2 centro lastra
Pedestals in centre of
sides and
2 in centre of slab
Preferibile per spazi
pubblici e carichi gravosi
Preferable for public
places and heavy loads
60x120 cm
Piedini a centro lato
Pedestals in centre of sides
Per applicazioni residenziali
e carichi leggeri con hpf
max 4 cm *
For residential applications
and light loads fph 4 cm
max *
60x120 cm
Piedini centro lato e n°2
centro lastra
Pedestals in centre of sides
and 2 in centre of slab
Preferibile per spazi pubblici
e carichi gravosi
Preferable for public places
and heavy loads
Piedino sui 4 vertici Piedini al centro lato
Pedestals on 4
corners
e centrale
Pedestal in centre
of sides
and centre
Incidenze piedini espresse in pcs/m
2
• Pedestal counts in pcs/m
2
• Bedarf an Stelzlagern in St./m
2
• Quantit
és des supports exprimées en pcs/m
2
• Incidencias pies expresadas en unidades/m
2
•
Расчетное количество стоек, шт./м
2
3,8
6,6
7,2
5,16
9,6
Hinweis
5
9,2
3,8
6,6
N.B.
Las incidencias son orientativas, con resultado aproximado
por defecto, y variables seg
ún la extensión de la superficie y la
regularidad del per
ímetro.
Примечание
Расчетное количество является ориентировочным
и округленным в меньшую сторону, оно меняется в
зависимости от размеров площади и от регулярности
периметра.
210
211
* hpf: altezza pavimento
finito / * fph: finished paving height
Nota bene
Le incidenze sono indicative, con risultato approssimato per
difetto e variabili in base all’estensione della super
ficie e alla
regolarit
à del perimetro.
N.B.
Pedestal counts are guideline. Results are rounded down and
may vary depending on the size of the area and the regularity
of the perimeter.
Der Bedarfsangaben sind annähernd und verstehen sich als
eine nach unten abgerundete Sch
ätzung. Sie können je nach
Ausdehnung der Fläche und Gleichmäßigkeit des Rands
variieren.
N.B.
Les quantités sont données à titre indicatif, avec un résultat
arrondi par défaut et variables en fonction de l’
étendue de la
surface et de la régularité du périmètre.

