Isolamento con tubo casing
Insulation with casing pipe
Premessa: effettuare la saldatura delle barre/raccordi
preisolati secondo le istruzioni descritte nel catalogo tec-
nico del sistema fusio-technik. Prima di procedere alla
saldatura, assicurarsi di aver infilato il tubo casing ancora
ricoperto dalla pellicola in dotazione.
Prodotto realizzato in conformità alla norma 489-1 (per
quanto applicabile).
Preliminary remark: perform the welding operation of the
pipes/fittings, by following the instructions that are de-
scribed in the fusio-technik technical catalogue. Before
welding, make sure that you introduced the heat-shrinking
casing pipe still covered with the supplied film.
Product manufactured in accordance with Standard 489-1
(where applicable).
38
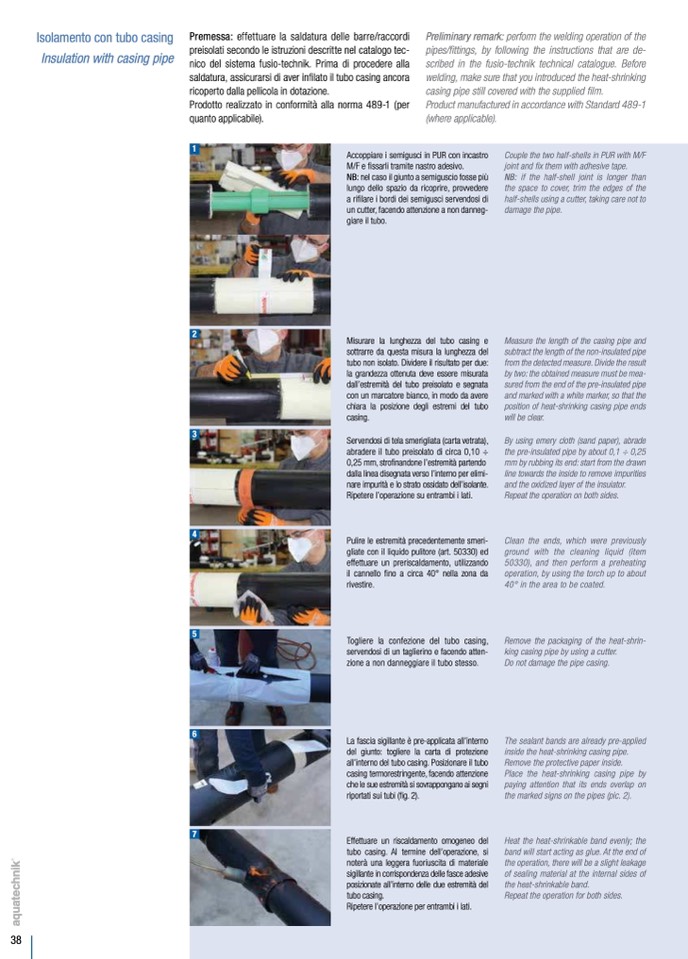
1
Accoppiare i semigusci in PUR con incastro
M/F e fissarli tramite nastro adesivo.
NB: nel caso il giunto a semiguscio fosse più
lungo dello spazio da ricoprire, provvedere
a rifilare i bordi dei semigusci servendosi di
un cutter, facendo attenzione a non danneg-
giare il tubo.
Misurare la lunghezza del tubo casing e
sottrarre da questa misura la lunghezza del
tubo non isolato. Dividere il risultato per due:
la grandezza ottenuta deve essere misurata
dall’estremità del tubo preisolato e segnata
con un marcatore bianco, in modo da avere
chiara la posizione degli estremi del tubo
casing.
Servendosi di tela smerigliata (carta vetrata),
abradere il tubo preisolato di circa 0,10 ÷
0,25 mm, strofinandone l’estremità partendo
dalla linea disegnata verso l’interno per elimi-
nare impurità e lo strato ossidato dell’isolante.
Ripetere l’operazione su entrambi i lati.
Pulire le estremità precedentemente smeri-
gliate con il liquido pulitore (art. 50330) ed
effettuare un preriscaldamento, utilizzando
il cannello fino a circa 40° nella zona da
rivestire.
Togliere la confezione del tubo casing,
servendosi di un taglierino e facendo atten-
zione a non danneggiare il tubo stesso.
La fascia sigillante è pre-applicata all’interno
del giunto: togliere la carta di protezione
all’interno del tubo casing. Posizionare il tubo
casing termorestringente, facendo attenzione
che le sue estremità si sovrappongano ai segni
riportati sui tubi (fig. 2).
Effettuare un riscaldamento omogeneo del
tubo casing. Al termine dell’operazione, si
noterà una leggera fuoriuscita di materiale
sigillante in corrispondenza delle fasce adesive
posizionate all’interno delle due estremità del
tubo casing.
Ripetere l’operazione per entrambi i lati.
Couple the two half-shells in PUR with M/F
joint and fix them with adhesive tape.
NB: if the half-shell joint is longer than
the space to cover, trim the edges of the
half-shells using a cutter, taking care not to
damage the pipe.
Measure the length of the casing pipe and
subtract the length of the non-insulated pipe
from the detected measure. Divide the result
by two: the obtained measure must be mea-
sured from the end of the pre-insulated pipe
and marked with a white marker, so that the
position of heat-shrinking casing pipe ends
will be clear.
By using emery cloth (sand paper), abrade
the pre-insulated pipe by about 0,1 ÷ 0,25
mm by rubbing its end: start from the drawn
line towards the inside to remove impurities
and the oxidized layer of the insulator.
Repeat the operation on both sides.
Clean the ends, which were previously
ground with the cleaning liquid (item
50330), and then perform a preheating
operation, by using the torch up to about
40° in the area to be coated.
Remove the packaging of the heat-shrin-
king casing pipe by using a cutter.
Do not damage the pipe casing.
The sealant bands are already pre-applied
inside the heat-shrinking casing pipe.
Remove the protective paper inside.
Place the heat-shrinking casing pipe by
paying attention that its ends overlap on
the marked signs on the pipes (pic. 2).
Heat the heat-shrinkable band evenly; the
band will start acting as glue. At the end of
the operation, there will be a slight leakage
of sealing material at the internal sides of
the heat-shrinkable band.
Repeat the operation for both sides.
2
3
4
5
6
7

