80
Inueva
Collezione Bagno
81
ISTRUZIONI PER IL SISTEMA DI SPONDE ESTRAZIONE TOTALE
ISTRUCTIONS FOR THE FULL EXTENTION SIDE PANEL SYSTEM
1
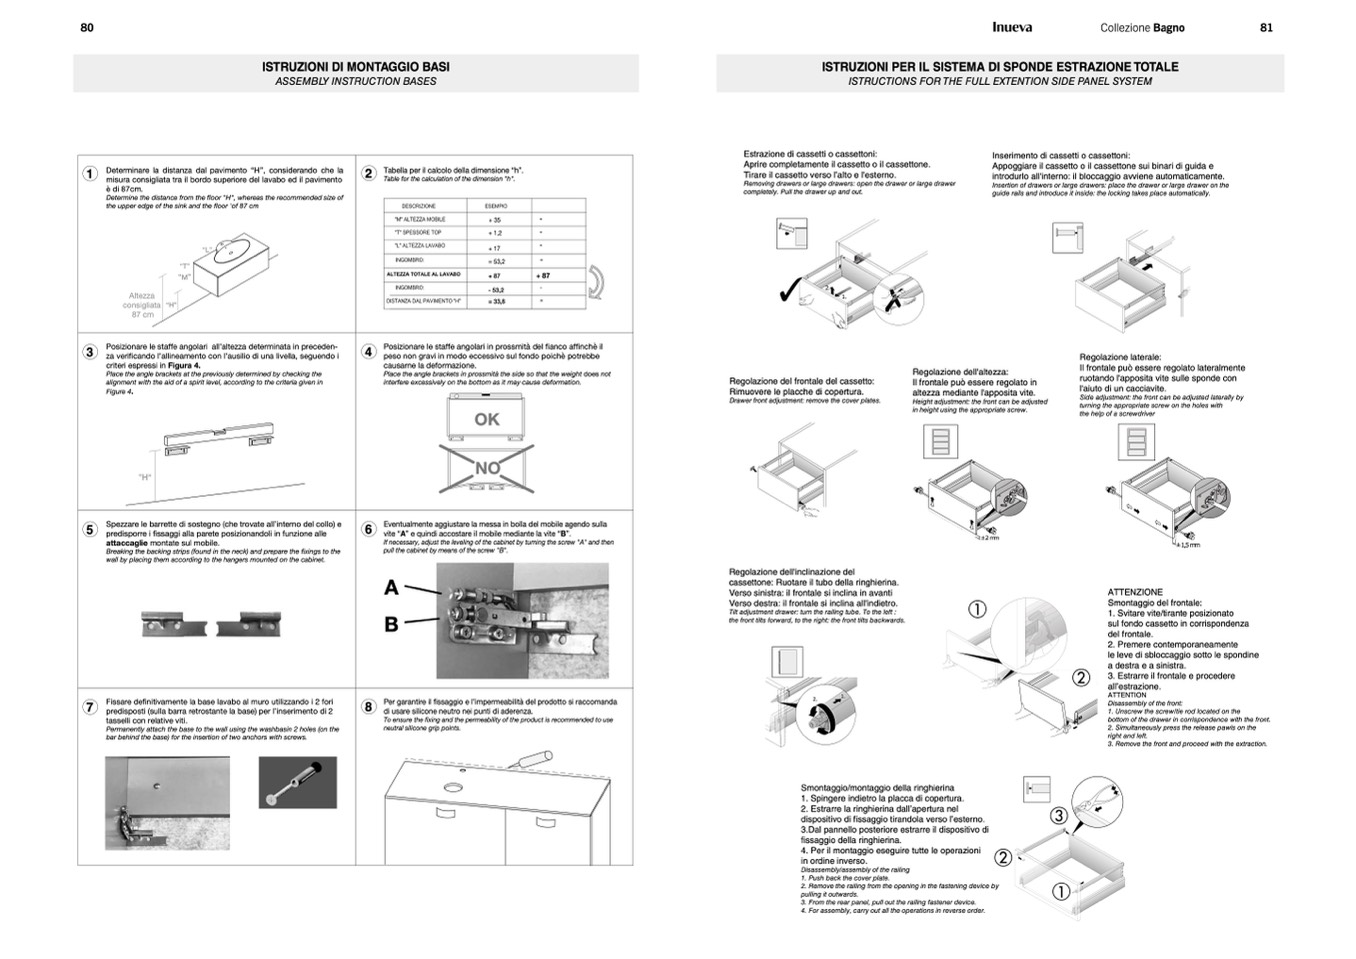
Determinare la distanza dal pavimento “H”, considerando che la
misura consigliata tra il bordo superiore del lavabo ed il pavimento
è di 87cm.
Determine the distance from the floor "H", whereas the recommended size of
the upper edge of the sink and the floor 'of 87 cm
“L”
“T”
2
Tabella per il calcolo della dimensione “h”.
Table for the calculation of the dimension "h".
+ 35
+ 1,2
+ 17
= 53,2
+ 87
- 53,2
= 33,8
Estrazione di cassetti o cassettoni:
Aprire completamente il cassetto o il cassettone.
Tirare il cassetto verso l’alto e l'esterno.
Removing drawers or large drawers: open the drawer or large drawer
completely. Pull the drawer up and out.
Inserimento di cassetti o cassettoni:
Appoggiare il cassetto o il cassettone sui binari di guida e
introdurlo all'interno: il bloccaggio avviene automaticamente.
Insertion of drawers or large drawers: place the drawer or large drawer on the
guide rails and introduce it inside: the locking takes place automatically.
“M”
consigliata “H”
+ 87
Altezza
87 cm
2.
1.
Regolazione del frontale del cassetto:
Rimuovere le placche di copertura.
Drawer front adjustment: remove the cover plates.
3
Posizionare le staffe angolari all’altezza determinata in preceden-
za verificando l’allineamento con l’ausilio di una livella, seguendo i
criteri espressi in Figura 4.
Place the angle brackets at the previously determined by checking the
alignment with the aid of a spirit level, according to the criteria given in
Figure 4.
”H“
5
Spezzare le barrette di sostegno (che trovate all’interno del collo) e
predisporre i fissaggi alla parete posizionandoli in funzione alle
attaccaglie montate sul mobile.
Breaking the backing strips (found in the neck) and prepare the fixings to the
wall by placing them according to the hangers mounted on the cabinet.
4
Posizionare le staffe angolari in prossmità del fianco affinchè il
peso non gravi in modo eccessivo sul fondo poichè potrebbe
causarne la deformazione.
Place the angle brackets in prossmità the side so that the weight does not
interfere excessively on the bottom as it may cause deformation.
OK
NO
6
Eventualmente aggiustare la messa in bolla del mobile agendo sulla
vite “A” e quindi accostare il mobile mediante la vite “B”.
If necessary, adjust the leveling of the cabinet by turning the screw "A" and then
pull the cabinet by means of the screw "B".
A
B
8
Per garantire il fissaggio e l’impermeabilità del prodotto si raccomanda
di usare silicone neutro nei punti di aderenza.
To ensure the fixing and the permeability of the product is recommended to use
neutral silicone grip points.
Regolazione dell'altezza:
Il frontale può essere regolato in
altezza mediante l'apposita vite.
Height adjustment: the front can be adjusted
in height using the appropriate screw.
Regolazione laterale:
Il frontale può essere regolato lateralmente
ruotando l'apposita vite sulle sponde con
l'aiuto di un cacciavite.
Side adjustment: the front can be adjusted laterally by
turning the appropriate screw on the holes with
the help of a screwdriver
7
Fissare definitivamente la base lavabo al muro utilizzando i 2 fori
predisposti (sulla barra retrostante la base) per l’inserimento di 2
tasselli con relative viti.
Permanently attach the base to the wall using the washbasin 2 holes (on the
bar behind the base) for the insertion of two anchors with screws.
2.
1.
ISTRUZIONI DI MONTAGGIO BASI
ASSEMBLY INSTRUCTION BASES
Regolazione dell'inclinazione del
cassettone: Ruotare il tubo della ringhierina.
Verso sinistra: il frontale si inclina in avanti
Verso destra: il frontale si inclina all'indietro.
Tilt adjustment drawer: turn the railing tube. To the left :
the front tilts forward, to the right: the front tilts backwards.
± 1,5 mm
ATTENZIONE
Smontaggio del frontale:
1. Svitare vite/tirante posizionato
sul fondo cassetto in corrispondenza
del frontale.
2. Premere contemporaneamente
le leve di sbloccaggio sotto le spondine
a destra e a sinistra.
3. Estrarre il frontale e procedere
all’estrazione.
ATTENTION
Disassembly of the front:
1. Unscrew the screw/tie rod located on the
bottom of the drawer in corrispondence with the front.
2. Simultaneously press the release pawls on the
right and left.
3. Remove the front and proceed with the extraction.
1
i
Smontaggio/montaggio della ringhierina
1. Spingere indietro la placca di copertura.
2. Estrarre la ringhierina dall’apertura nel
dispositivo di fissaggio tirandola verso l’esterno.
3.Dal pannello posteriore estrarre il dispositivo di
fissaggio della ringhierina.
4. Per il montaggio eseguire tutte le operazioni
in ordine inverso.
3
2
3.
1.
Disassembly/assembly of the railing
1. Push back the cover plate.
2. Remove the railing from the opening in the fastening device by
pulling it outwards.
3. From the rear panel, pull out the railing fastener device.
4. For assembly, carry out all the operations in reverse order.
i
i
± 2 mm
1
2
i
2.

